0%

Choosing Bespoke Architectural Light Sculptures requires more than selecting an attractive shape. The installation must respond to architecture, movement, material, and human comfort. A glowing form may look dramatic in a sketch, yet feel harsh beneath a low ceiling. Scale matters.

This guide introduces seven practical tips for making a confident decision. They reflect common considerations used by lighting designers, architects, fabricators, and project managers. Each recommendation connects visual ambition with measurable performance, including brightness, glare control, color temperature, energy use, and maintenance access. Ask for photometric data. Review the dimming system. Confirm the product’s safety documentation and environmental suitability.

Details often decide the outcome. Imagine a sculptural pendant above a hotel staircase, with warm light washing across brushed brass. Now consider the shadows on nearby artwork, the cleaning equipment required, and the view from the entrance. These details are easy to overlook. They should not be.

Practical experience also teaches humility. A perfect digital rendering cannot predict every reflection, ceiling obstruction, or installation delay. Some assumptions will be wrong. Recheck them. Reliable suppliers should explain material samples, structural loads, warranties, replacement parts, and expected lead times without vague promises. Collaboration is essential, especially when the sculpture includes custom optics, concealed wiring, or complex controls.

The best choice balances emotion and evidence. It should create a memorable atmosphere while serving the building for years. These seven tips will help you question impressive designs, identify hidden risks, and choose a Bespoke Architectural Light Sculptures solution with greater clarity.
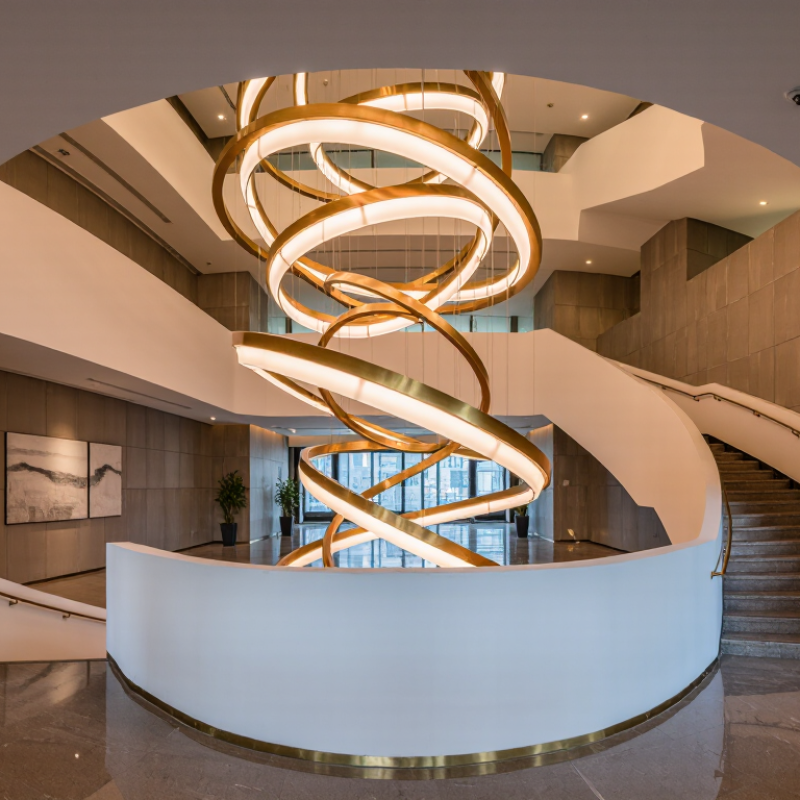
7 Tips for Choosing Bespoke Architectural Light Sculptures

Define the Sculpture’s Purpose Using IES Illuminance Targets in Lux

Tip 1: Define the sculpture’s purpose before discussing its shape. Is it guiding visitors, supporting artwork, or creating a quiet focal point? Each purpose needs a different IES illuminance target, measured in lux. A reception feature may need gentle ambient light, while a detailed display requires stronger, controlled illumination. Name the visual task clearly.

Tip 2: Set the target on the correct measurement plane. Measure light on the floor for circulation, on a tabletop for reading, or vertically for artwork. Do not rely only on the fixture’s lumen output. A sculptural form can absorb, reflect, or block light in unexpected ways. I have seen attractive prototypes create dark patches beneath their frames. My first estimate was too generous. A site test would have exposed the problem earlier.

Tip 3: Treat lux as a design guide, not a single perfect number. Record average, minimum, and maximum readings across the intended area. Check uniformity, shadows, glare, and viewing comfort at night. A qualified lighting professional can model the sculpture and verify results with a calibrated meter. Local standards may also affect the target. Keep a small adjustment range, because real materials rarely behave exactly like digital models.

Before approving fabrication, review a full-scale mock-up under realistic conditions. Stand at eye level, walk around it, and inspect nearby surfaces. The best bespoke sculpture should perform its visual role, not merely look impressive in isolation.

Define the Sculpture’s Purpose Using IES Illuminance Targets

Use the intended architectural setting to establish a target illuminance level before designing a bespoke light sculpture. These typical maintained illuminance values are expressed in lux and should be verified against the project’s applicable IES guidance, local codes, surface reflectance, and visual-comfort requirements.

Lower lux levels support circulation and ambience, while higher levels improve visual tasks and display detail. The sculpture’s optical distribution, glare control, dimming range, and color appearance should be selected to achieve the target without excessive brightness.

Set Visual Quality Standards with CRI 90+ and UGR 19 Glare Control

Bespoke architectural light sculptures should be judged by visual performance, not dramatic form alone. Specify a colour rendering index of CRI 90 or higher for galleries, hospitality spaces, and premium interiors. The CIE 13.3-1995 method defines CRI as a colour-fidelity measure, but CRI has limits. It can hide differences in saturated red and skin tones. Request IES TM-30 data, including Rf and Rg, beside the CRI value.

Glare control deserves equal attention. EN 12464-1:2021 commonly recommends UGR 19 or lower for office and visually demanding work areas. A sculpture can look elegant while producing harsh reflections on glass, polished stone, or computer screens. Ask for photometric files, viewing-angle tests, and a UGR calculation for the actual room. Do not rely on a showroom sample. Ceiling height, wall reflectance, spacing, and observer position can change the result.

Check the light source, diffuser, dimming range, colour consistency, maintenance access, and emergency-lighting compatibility. Inspect the sculpture at eye level, not only from the floor. A 1,000-lumen fitting may feel comfortable in a dark gallery but uncomfortable beside bright windows. That detail is easy to miss. Also request measured performance from an accredited laboratory, preferably using LM-79 procedures. Higher CRI does not guarantee better visual comfort. A thoughtful specification balances colour accuracy, UGR 19 glare control, luminance distribution, and the real behaviour of people inside the space.

7 Tips for Choosing Bespoke Architectural Light Sculptures — Set Visual Quality Standards with CRI 90+ and UGR 19 Glare Control
Tip Selection Dimension Recommended Standard What to Verify in the Specification Why It Matters Priority
1 Colour Rendering Quality CRI (Ra) ≥ 90
Use higher special-index values where saturated red appearance is important.
Request the complete colour-rendering report, including Ra and, where available, R9. Confirm that the rating applies to the selected LED, optical system and operating current. High colour rendering helps materials, artwork, finishes and architectural details appear closer to their intended colours than lower-CRI sources. Essential
2 Glare Control UGR ≤ 19 for many office and screen-based environments, subject to the actual room layout. Ask for a UGR calculation based on room dimensions, reflectance values, luminaire spacing, observer positions and photometric data. Do not rely on a fixture-only claim. Lower unified glare rating can reduce disturbing glare, improving visual comfort in spaces used for reading, computer work and prolonged occupancy. Essential
3 Colour Temperature 2700–3000 K for warm hospitality and residential moods;
3500–4000 K for neutral work-oriented settings.
Specify nominal CCT, tolerance, LED binning and whether the colour temperature is fixed or tunable. Compare samples under the intended surrounding finishes. Colour temperature influences atmosphere, perceived material colour and the visual relationship between the sculpture and daylight or other luminaires. High
4 Light Distribution and Uniformity Define the required beam pattern and target uniformity for the surface being illuminated; avoid specifying uniformity without a measurement plane. Review the IES or equivalent photometric file, polar curves, beam angle, shielding design, hot-spot control and calculated illuminance uniformity. Test a full-scale mock-up for complex forms. Controlled distribution prevents bright spots, dark gaps and unwanted spill light while preserving the intended sculptural rhythm. Essential
5 Flicker and Dimming Performance Select drivers with documented low-flicker performance across the complete dimming range; verify compatibility with the chosen control protocol. Request flicker metrics such as percent flicker and flicker index at relevant dimming levels. Confirm behaviour with DALI, 0–10 V, phase-cut or other specified controls. Stable output supports visual comfort, photography and video recording, especially in public, retail, exhibition and workplace environments. High
6 Thermal and Electrical Reliability Use a properly rated constant-current driver and specify a design life such as L70 ≥ 50,000 hours under stated operating conditions. Check ambient-temperature limits, LED case-temperature assumptions, driver location, surge protection, power factor, inrush current and emergency-lighting requirements where applicable. Effective thermal management helps protect colour consistency, light output and service life in enclosed or high-output custom installations. Essential
7 Integration, Maintenance and Safety Coordinate structural loads, access, cleaning, replacement strategy and applicable electrical and fire-safety requirements before fabrication. Verify mounting details, component accessibility, cable routing, IP rating for the installation location, material reaction-to-fire requirements and installation documentation. A visually successful bespoke sculpture must also be serviceable, structurally secure and suitable for its environmental conditions. Essential

Choose 2700–3000 K for Hospitality and 3500–4000 K for Offices

Bespoke architectural light sculptures should support the room before attracting attention. In hospitality spaces, 2700–3000 K usually creates a warm, welcoming atmosphere. It suits timber, stone, brass, and evening dining. Warmer light can also flatter skin tones and soften hard architectural edges. However, overly warm light may make food colors appear dull. Test the sculpture beside the actual finishes, not only on a computer screen.

Offices often benefit from 3500–4000 K. This range feels cleaner and supports visual tasks without appearing clinical. Check the sculpture’s color rendering index, glare control, and dimming performance. A high color quality rating matters near artwork, printed materials, and detailed surfaces. Ask the fabricator for photometric data and a physical sample. Small differences in diffusion can change the entire ceiling effect.

Scale, viewing angles, access, and maintenance deserve equal attention. A sculpture may look elegant from the entrance but create glare from a seated position. Review it at eye level, from desks, and beneath the installation. Confirm cable routes, cleaning access, heat management, and replacement procedures early. A full-scale mock-up may look less dramatic than the rendering. That is valuable feedback. Designers sometimes overestimate brightness because empty rooms exaggerate contrast. Leave room for adjustment, and measure the result after furniture, curtains, and occupants enter.

Specify LEDs Delivering 100 lm/W+ with Dimming and Lighting Controls

Bespoke architectural light sculptures need more than attractive forms. Specify LEDs delivering at least 100 lumens per watt at luminaire level, not merely at chip level. This distinction matters. Optics, drivers, diffusion materials, and heat can reduce delivered efficacy significantly. The U.S. Department of Energy’s 2023 Solid-State Lighting R&D Opportunities report records laboratory efficacies above 200 lm/W, but installed systems usually perform lower.

Treat 100 lm/W as a practical floor, not a finish line.

Ask for LM-79 photometric testing and LM-80 lifetime data before approving samples. These reports reveal output, color quality, and lumen maintenance under defined conditions.

A sculpture may look bright in a studio, yet appear weak across a large lobby. Select dimmable drivers with smooth low-end performance and verify compatibility with 0–10 V, DALI-2, or DMX control systems.

The control platform should support scheduled scenes, occupancy response, and commissioning access.

According to the U.S. Department of Energy’s 2014 commercial lighting report, advanced controls can reduce lighting energy use by roughly 20–40% in suitable buildings.

Keep the detail visible. Specify minimum dimming levels, fade times, emergency behavior, and maximum driver temperature. Check flicker with suitable measurement methods, especially near reflective metal or moving visitors.

I have seen projects overvalue peak output and undervalue nighttime comfort. That mistake is easy to repeat.

Review mock-ups at full power, 30%, and the lowest stable setting before final fabrication.

Confirm Scale, IP Rating, Maintenance Access, and Photometric Data

7 Tips for Choosing Bespoke Architectural Light Sculptures

Confirm the sculpture’s scale before approving its design. A dramatic model can feel weak in a tall atrium. A large installation can overwhelm a narrow lobby. Mark the proposed dimensions on site with tape or a temporary frame. View it from the entrance, upper floors, and nearby seating. Human sightlines matter more than a polished computer rendering. I once underestimated a ceiling void, and the sculpture looked visually lost. That mistake still influences my checking process.

IP rating needs equal attention. Indoor dry areas may require a lower rating, while entrances, courtyards, and humid spaces need stronger protection. Ask for the exact IP code, test conditions, and installation limits. Do not accept vague claims such as “weather resistant.” Water can enter through cable joints, not only through the visible housing. Salt air creates additional corrosion risks. The environment decides the specification.

Maintenance access should be drawn, not assumed. Technicians may need a lift, removable panels, or safe access to drivers and connectors. Leave enough clearance for gloved hands and replacement parts. Request photometric data, including luminous flux, beam angle, colour temperature, glare values, and lighting uniformity. Review the files against the room’s surfaces and viewing distance. A beautiful sculpture can still create harsh reflections. Photometric calculations are useful, but they are not perfect. Test a sample section on site when possible.

FAQS

How should the sculpture’s lighting purpose be defined?

Identify the visual task before choosing its shape. It may guide visitors, support artwork, or create a quiet focal point. Each purpose needs a different illuminance target. A reception feature may need gentle ambient light. A detailed display may require stronger, controlled illumination. Name the task clearly.

Where should illuminance be measured?

Measure light on the surface people actually use. Check the floor for circulation areas. Use a tabletop for reading tasks. Measure vertically for artwork. Do not judge performance from fixture lumens alone. Sculptural frames can block light unexpectedly.

What lighting measurements should be recorded?

Record average, minimum, and maximum readings across the target area. Check uniformity and shadow patterns. Inspect glare at night. Also assess viewing comfort from normal sightlines. Lux is a guide, not a perfect answer. Real materials may behave differently.

Why is a full-scale mock-up important?

A mock-up reveals problems that drawings may hide. Use realistic surfaces, mounting heights, and operating conditions. Stand at eye level and walk around the sculpture. Inspect nearby walls, floors, glass, and polished stone. A prototype may create dark patches underneath. Plans can mislead.

What colour quality should the light source provide?

Specify a colour rendering index of 90 or higher for demanding interiors. Also request colour-fidelity and gamut data. A single colour score has limitations. It may not reveal weak saturated reds or inaccurate skin tones. Compare samples under actual room lighting. Higher is not always better.

How can glare be controlled?

Set a clear glare target for visually demanding areas. A commonly used limit is a unified glare rating of 19 or lower. Check reflections on screens, glass, and polished stone. Review the real room, not only a showroom sample. Ceiling height and wall reflectance change glare. Comfort matters.

What should be checked for installation and maintenance?

Confirm the sculpture’s full scale before fabrication. Mark its dimensions with tape or a temporary frame. View it from entrances, upper floors, and nearby seating. Draw maintenance access into the design. Technicians may need lifts, removable panels, or safe driver access. Leave clearance for gloved hands.

How should environmental protection and performance data be verified?

Match the protection rating to the location. Humid areas, courtyards, and entrances need stronger protection than dry interiors. Request the exact rating and test conditions. Inspect cable joints because water can enter there. Ask for luminous flux, beam angle, colour temperature, glare, and uniformity data. Test a sample section onsite when possible.

Conclusion

Choosing Bespoke Architectural Light Sculptures requires balancing artistic expression with measurable lighting performance. Begin by defining the sculpture’s purpose and using IES illuminance targets in lux to determine how much light each area needs. Establish visual quality standards with LEDs rated CRI 90 or higher, while controlling glare through a UGR target of 19 or below. Color temperature should support the atmosphere: warm 2700–3000 K tones suit hospitality spaces, while neutral 3500–4000 K light is often appropriate for offices.

Technical planning is equally important. Specify efficient LEDs delivering at least 100 lm/W, together with dimming capability and compatible lighting controls for flexible operation. Before final approval, confirm the sculpture’s scale, installation conditions, and IP rating. Ensure maintenance access is practical, and request complete photometric data to verify light distribution, brightness, and performance. This process helps create a visually distinctive installation that remains comfortable, efficient, maintainable, and suitable for its architectural environment.

Ethan Anderson

Ethan Anderson

Ethan Anderson is a dedicated marketing professional with a deep understanding of the company’s products, customer needs, and evolving market trends. Through years of experience in strategic communication, content development, and audience engagement, he helps transform complex product information......